5 Tips to Rock Your Boat Pose
Do boat pose to strengthen your hip flexors
Boat pose, or paripurna navasana, is an oldie but goodie when you want to strengthen your core. It simultaneously works your hip flexors, abdominals and adductor muscles.
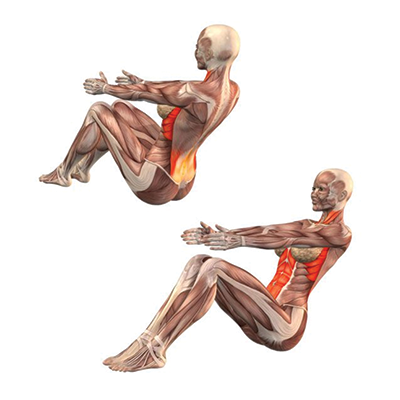
 But it seems many people misunderstand the nature of boat pose. Sure, your abdominal muscles will support you in the pose. But the real co-stars of the show are your hip flexors, specifically your iliopsoas and rectus femoris muscles. Your hip flexors are a group of muscles that decrease the angle of your hip joint. In other words, these muscles bring your belly and thigh bones closer together.
Paripurna navasana is a challenging yet effective yoga pose that will help you lighten up your practice a bit. When the hip flexors are strong, you’re able to step forward a bit more gracefully or float forward more gently from Downward Facing Dog. As vinyasa yogis, we tend to overstretch the hip flexors (think low lunge) compared to how little we strengthen them. That’s why it’s Powerflow Yoga’s June Pose of the Month. Here are 5 tips to help any beginner, intermediate or advanced yogi rock their boat pose.
1. Root to rise
Students often focus too much on the outward expression of a yoga pose. In boat pose, for example, they’re so concerned with how high they can lift their legs that they lose all sense of orientation. Focus your awareness on the floor—specifically how your pelvis sits on your mat.
The floor is one of the most useful props available to you. Begin boat pose seated with your feet flat on the floor. Roll your buttocks flesh back so your tailbone isn’t scooped under your body. Press the heads of your thighs bones into your mat to stabilize the body. By pressing into the floor, you can lift through the roof of your mouth to find more axial extension in your spine.
2. Use a block between your thighs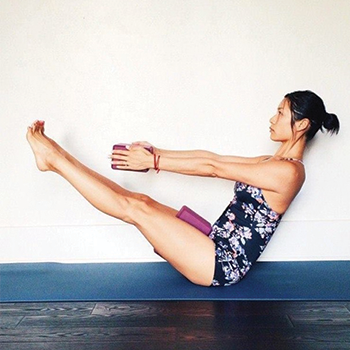
The hip flexors are one of the most commonly misunderstood muscles in the human body. When most people talk about the hip flexors, they’re usually referring to the iliopsoas muscles. But there are many others. In fact, four out of your five adductor muscles (inner thighs) aid in hip flexion.
With your knees still bent and feet flat, place a block between your thighs “as high as socially acceptable,” as PFY Morristown teacher MJ Turnbull says. Lightly squeeze the block with your thighs, and you’ll find you have more control over your body when flexing your hip joints later. This is called synergism. By recruiting more muscles to flex your hips, you create a greater effect than that of an individual muscle.
3. Keep your feet on the floor
Now you’re ready to practice the pose. Keep your feet on your mat, knees bent with a block between your thighs and place your hands on your shins. Without changing the shape of your spine (don’t slump!), begin to lean back until your elbows straighten. Pause here.
 You’ll notice that by simply leaning back while your hands are on your shins, your hip flexors will begin to fire up. They are eccentrically contracting: getting longer in a contracted position (lengthening while strengthening). Even though your feet are on the ground, your hip flexors are working hard to keep your body in this pointy V-shape.
This is a good place to tune into your breath. Welcome your breath back into your body before moving onto a more strenuous paripurna navasana variation.
4. Place your fingertips on your mat
Once you’ve built up enough strength to lean back with straight arms and steady breath, place your fingertips on your mat. Without changing the shape of your body, just firmly press your fingertips into your mat. This will cause you to press your shoulder blades into your back body, which will help you keep your chest lifted.
Keeping your fingertips on your mat is also a phenomenal way of developing proprioception. Your fingertips have a lot of nerve endings that help your brain clarify where your body is in space. By orienting your brain to the floor, you’ll rely less on your eyes and mirrors to understand your posture.
5. Keep your knees bent
When you’re finally ready to float your shins up, keep your knees bent. Keep your spine long, chest lifted and just lift your ankles as high as your knees. You’ll notice that this is much more taxing on your hip flexors than when your feet were on your mat.
Gravity is a strong opponent in paripurna navasana—it wants to push your body down. When the legs are straight, the lever of the leg is longer and therefore much heavier. By keeping your knees bent, you lessen the effect of gravity without losing the intensity of the full expression of boat pose.
 Paripurna navasana: putting it all together
It’s important to regularly take your practice back to the basics. No, we’re not saying to lose sight of your goals. Just lighten up a bit. Next time you practice, intentionally do what you might consider a more “basic” variation of boat pose.
Remember that straightening the legs is really the last action of the pose, but most people try to do it first. But when you’re ready, lift your arms to the height of your knees. Keep your throat open, and press forward through your heels to slowly straighten your knees without compromising the integrity of your posture or breath.
